 Oxify
OxifyShopify Order Status Page: Customize It, Find the URL & Cut WISMO (2026)
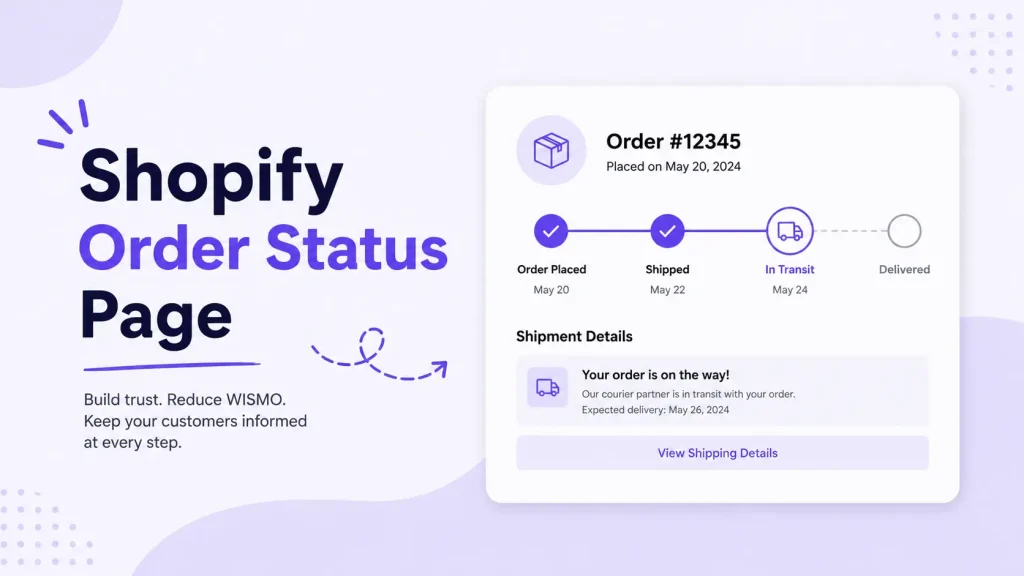
Quick answer: The Shopify order status page is where customers track and revisit their order after checkout. Customize it in Settings > Checkout > Edit, then switch the page selector to Order status. It's drag-and-drop, no code, and works on every plan including Basic. It's a separate page from the one-time thank you page, so blocks on one don't appear on the other.
If your page changed after the August 26, 2026 upgrade deadline: stores that had not upgraded were upgraded automatically, and old Additional scripts and script tags were removed rather than migrated. Jump to the post-upgrade check.
Key facts (verified September 2026; guest access and statuses re-checked October 11, 2026)
- Guest access: 3 weeks from the confirmation email in the same browser; 2 weeks across up to 5 different browsers. After that, a limited view (items, total, discounts, status) until the customer verifies (Shopify Help Center).
- Statuses shown: Confirmed, On its way, Out for delivery, Delivered, Attempted delivery, with a map for supported carriers.
- URL: unique per order on your own domain; the
/orders/path cannot be renamed. - Plans: branding and app blocks on the order status page work on Basic, Grow, Advanced and Plus.
- 2026 upgrade: "August 26, 2026 was the deadline" for non-Plus stores, and pausing a store upgrades its pages permanently (Shopify Help Center).
Older guides tell you to paste code into "Additional scripts" (a field that no longer does anything), assume Shopify Plus, or repeat the myth that you can rename the order status page URL. You can't. This guide is written for the post-upgrade checkout, covers every plan (Basic, Grow, Advanced, Plus), and includes the URL rules, notification setup, tracking, troubleshooting, and the support-cost math.
How it was checked: on October 11, 2026 we re-read the Shopify Help Center page on order status pages and Shopify's developer docs for the thank you and order status pages, and read the live App Store listing of every app we put a rating or price next to. Each figure below says what it came from.
What Is the Shopify Order Status Page?
The Shopify order status page is the final page of your store's checkout, where customers track their order and view shipping updates. Once you add a tracking number to a fulfillment, customers return to this page to check where their package is instead of emailing your support inbox.
In plain terms: it's the page a customer can come back to for weeks after they pay, and it gets repeat visits without you spending anything to earn them. Shopify also uses it as the destination of the "View your order" button in the order confirmation email.
What every merchant should know:
- It exists by default on every Shopify plan, including Basic. You don't create it.
- Each order gets its own unique, private URL that can't be guessed.
- It updates in real time when a supported carrier reports shipment progress.
- Customers revisit it multiple times during the delivery window.
- It's editable with drag-and-drop blocks inside the checkout and accounts editor, no code.
Order status types
The status shown to the customer updates automatically as the carrier reports progress:
- Confirmed — the order was placed but hasn't shipped yet
- On its way — the order was marked fulfilled (or partially fulfilled) and the shipment is in transit
- Out for delivery — the shipment has reached the customer's area and will be delivered soon
- Delivered — the carrier confirmed delivery
- Attempted delivery — the carrier tried and failed to deliver
If you ship with a carrier Shopify doesn't natively support, the page shows a tracking link out to the carrier instead of live status updates. And if you fulfill an order in multiple shipments, the page adds a tracking section per shipment rather than showing one combined status.
One detail that causes tickets: if you fulfill an order without a tracking number, the status stays On its way until you mark the order as delivered yourself (Shopify Help Center, checked October 11, 2026). Attach tracking to every shipment you can.
Native features already on the page
Before you add a single app, the order status page already does several things merchants often go looking for an app to do:
- Live shipment status and a map for supported carriers, once a tracking number is on the fulfillment
- Multiple shipments shown separately when an order ships in more than one package
- Shop app tracking for customers who use Shop
- Customer account sign-in, which unlocks the full order details and order history
- Self-serve return requests and a buy again option through customer accounts, if you have them switched on (check Settings → Customer accounts)
How Customers Access Your Order Status Page
Customers reach the page through four routes:
- Order confirmation email or SMS: Shopify includes the tracking link automatically in the default notification templates
- Shop app: logged-in customers track all their Shop orders in one place
- Customer account: anyone with an account sees order history with direct links
- Order lookup: guests can verify with their order number plus the email or phone used at checkout
How long guest access lasts
The access window is tighter than most merchants realize, and it's the root cause of most "my customer says the link doesn't work" tickets:
- Same browser: 3 weeks without logging in
- Different browsers: 2 weeks, across a maximum of 5 browsers
After that window, the customer has to log in or verify their identity with their order number and the email or phone used at checkout. If they don't, they still see a limited view: items, order total, discounts, and order status. Their name, billing and shipping addresses, payment method, shipping method and tracking number stay hidden.
The "Log in to view all order details" prompt does not require a customer account with your store, but login links make it easier for customers to unlock the full page. To show them, set up customer accounts and leave Show login links on; they don't display on stores that use legacy customer accounts (Shopify Help Center, checked October 11, 2026). If customers report a limited page and can't see how to unlock it, check that setting first.
The same rule applies when a customer forwards the link to someone else. The recipient gets the restricted view, not the full order. That's a privacy feature, not a bug, and it's worth knowing before you tell a customer to "just share the link."
The Shopify Order Status Page URL (And the Myth About Changing It)
Every order has a unique order status URL in this shape:
https://yourstore.com/orders/{order_token}
Older orders and authenticated views may append an authentication parameter, for example /orders/{order_token}/authenticate?key=.... The token is random and order-specific, which is what keeps the page private.
To find the URL for any order: go to Orders in your Shopify admin, open the order, then click More actions > View order status page. That opens the exact page your customer sees, and you can copy the URL from the address bar.
The myth to ignore: several popular articles claim you can rebrand the URL path to something like yourstore.com/track-order/12345. You cannot. The /orders/ path and the token are generated by Shopify and aren't editable in admin, by theme code, or by app. The only part of the URL you control is your own domain. If you want a branded tracking experience at a custom URL, that requires a dedicated order tracking app that hosts its own tracking page on your storefront, which is a separate page from Shopify's native order status page.
Using order_status_url in notifications
If you're on Shopify's default email templates, the order status link is already included. Nothing to do.
If you (or a past developer) customized your order confirmation, shipping confirmation, or shipping update templates, Shopify can no longer inject that link automatically, and this is one of the most common silent breakages in a Shopify store. You have two options:
- Click Revert to default on the template, which also erases every other customization you made
- Manually add the
{{ order_status_url }}Liquid variable back into the template, wrapped in your own link
Option 2 in practice, inside Settings > Notifications:
<a href="{{ order_status_url }}">Track your order</a>
SMS templates include the link automatically and don't need this. And if customers say they never got a shipping update, check the fulfillment itself (was the order fulfilled, and does it carry a tracking number?) before you blame the template.
Order Status Page vs Thank You Page: They're Two Different Pages
This is where older articles go wrong. Since Shopify's 2025 upgrade, the thank you page and the order status page are two separate pages. They share one editor and one set of brand settings, but they're edited separately and they behave very differently.
| Feature | Thank You Page | Order Status Page |
|---|---|---|
| When customer sees it | Immediately after payment | Via confirmation email link or order history |
| Repeat visits | One-time only | Multiple times during delivery |
| Identifier shown | Confirmation number | Order number |
| Best use case | Fallback offer, survey, referral, account creation | Tracking, delivery estimate, support, reorders, loyalty signup |
| Guest access | Same session only | 3 weeks same browser, 2 weeks cross-browser |
| Attention level | Highest of the entire funnel | High, but goal-driven (they came to check tracking) |
Shopify's developer docs describe the hand-off: the thank you page is the initial purchase confirmation, and a customer who returns to it, or checks their order status later, is shown the order status page instead. A block on the thank you page also renders before the order exists (only the order id and confirmation number are available), while a block on the order status page can always read the order (shopify.dev, checked October 11, 2026).
The practical takeaway: put the one-time asks on the thank you page (and true one-click offers on the separate post-purchase page that comes before it; see Shopify post-purchase page vs thank you page). Put reassurance on the order status page, because that's where a customer arrives anxious about where their package is. Getting these backwards is why a lot of post-purchase setups underperform. For how to edit the thank you page and what to put on it, see our Shopify thank you page guide with 20 ideas.
What This Page Is Actually Worth (The WISMO Math)
Most articles argue for optimizing this page on vibes. Here's the actual business case, and it runs on two separate ledgers.
Ledger 1: Support cost you're already paying
"Where is my order?" (WISMO) is one of the most common ecommerce support tickets, and every one of them asks a question the order status page can already answer. Published estimates of its share vary widely by help desk and season, so use your own numbers: tag a week of tickets in your help desk and count the WISMO ones.
Then run the arithmetic. Illustrative inputs for a store handling 1,000 orders a month:
- If 10% of customers ask where their order is: 100 tickets
- At an assumed $6 of agent time per ticket: $600 a month, or about $7,200 a year
- Replace both inputs with your own ticket count and cost per ticket
A visible tracking widget, a clear estimated delivery date, and honest "what happens next" copy typically deflect a meaningful share of that. It isn't glamorous work, but it's the highest-certainty return on this page. You aren't hoping for a lift — you're removing a cost you're definitely already paying.
Ledger 2: Attention you're not monetizing
The second ledger is the one nobody bills you for. Customers can return to this page repeatedly between purchase and delivery — Shopify's developer docs say they can refresh or revisit it throughout fulfillment, and often arrive from the confirmation email link. Those are impressions on your most qualified audience possible: people who have already given you money and are actively thinking about your brand.
You paid acquisition cost to earn that attention once. The order status page can give it back to you several times per order, for free. On the default layout, those impressions go unused.
The two ledgers point in different directions, and that's the strategic call this whole page comes down to: deflect first, monetize second. A customer who can't find their tracking number will not buy your upsell. Answer the question they came with, then make the ask.
What the August 26, 2026 Upgrade Changed
Shopify has retired the legacy way of customizing these pages. If your store relied on it, your tracking pixels, custom scripts and old app blocks stopped working, quietly, with no visible error on your storefront.
The dates that matter:
- Shopify Plus: the deadline was August 28, 2025, and Plus stores still on legacy pages were upgraded automatically after it.
- Non-Plus (Basic, Grow, Advanced): "August 26, 2026 was the deadline," and stores that had not upgraded by then "were upgraded automatically" (Shopify Help Center).
- Additional scripts: view-only since August 28, 2025. Any tutorial that tells you to paste a snippet into Additional scripts is out of date on every plan.
What happened at auto-upgrade. Legacy customizations were removed, not migrated. That means:
- Anything in Additional scripts stopped firing, including Google Ads conversion tags, Meta pixel, GTM containers and affiliate scripts
- App script tags injected into the old pages disappeared
- Apps whose developers never moved to checkout UI extensions stopped rendering
- Any custom fields or post-purchase code wired to the legacy system went silent
Your revenue reporting breaks before you notice the page looks different. That's the real risk, and why the check below is worth ten minutes even if you think you upgraded cleanly.
The post-upgrade check (do this now)
- Confirm the upgrade. Go to Settings > Checkout and look at the Configurations section. If an upgrade notice is still there, click Review, rebuild what you need with blocks, and click Upgrade.
- Rebuild tracking as web pixels. Use each ad platform's own app pixel where one exists, or add a custom pixel under Settings > Customer events subscribed to
checkout_completed. - Re-place app blocks. Open the editor, switch to Order status, and check every block you expect is there; do the same for Thank you.
- Place a real test order and verify every pixel fires and every block renders.
One more trap from Shopify's help center: "If you pause your store, then your store's Thank you and Order status pages are upgraded automatically. This upgrade is permanent." Seasonal stores that paused before the deadline were upgraded that way.
How to Customize the Shopify Order Status Page (Step-by-Step)
Works on every Shopify plan. No code. Around 10 minutes.
Step 1: Open the checkout and accounts editor
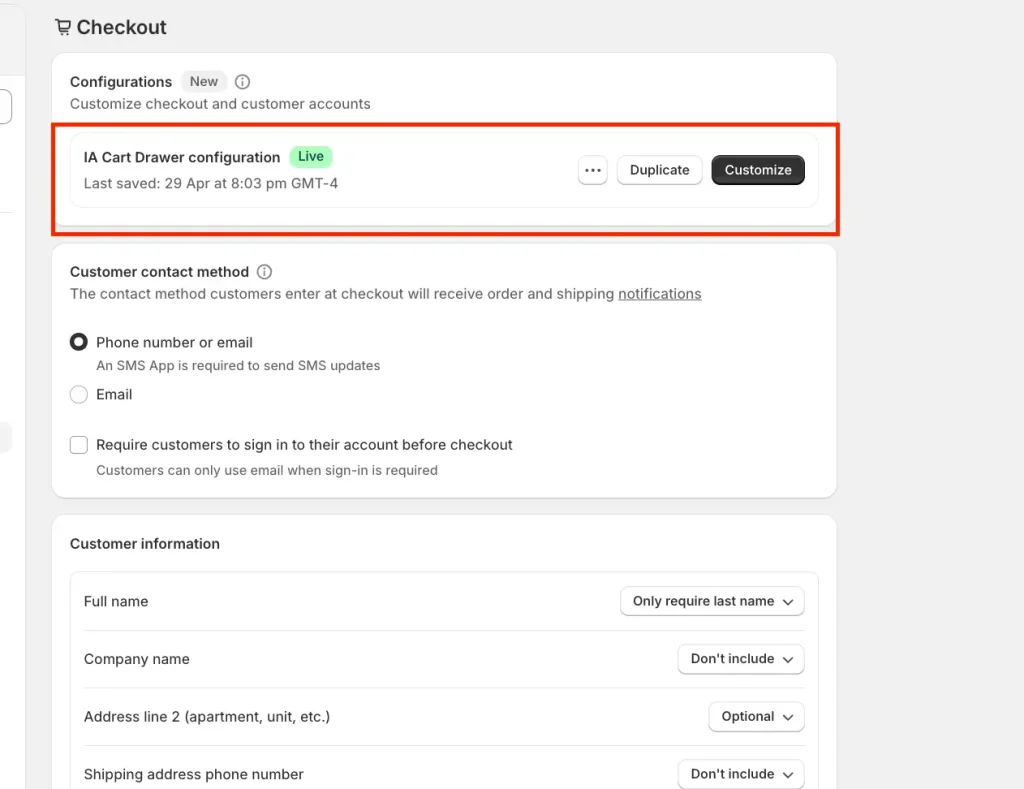
- From your Shopify admin, click Settings (bottom left)
- Click Checkout
- In the Configurations section, find your active checkout and click Edit (called Customize in older versions of the admin)
Step 2: Switch to the Order status page view
At the top of the editor, click the page selector dropdown. It defaults to Checkout. Switch it to Order status.
This is the single most common mistake merchants make. They edit the Thank you page, save, then wonder why the order status page looks unchanged. Always confirm the dropdown before you drag anything.
Step 3: Set your brand defaults
In the left sidebar, click the gear icon for Settings, then adjust:
- Logo position and size
- Background color or image
- Accent color (buttons and links)
- Font family
- Corner radius
These cascade across Checkout, Thank you, and Order status, so you set them once. If you're on Shopify Plus and want finer control than the editor exposes, the Checkout Branding API goes deeper.
Step 4: Add app blocks and content blocks
Click the section area where you want content, then Add app block. Two kinds of blocks are worth knowing:
Free content blocks: text, images, banners and accordions come from Shopify's own free Checkout Blocks app (4.1 from 220 reviews, checked October 11, 2026), which works on the thank you and order status pages on every plan. Without any app, you can change branding and reorder or hide the existing sections.
App blocks from any installed app built on checkout UI extensions. The most useful categories on this page: order tracking, product recommendations and reorder, loyalty programs, reviews, surveys, subscriptions, digital downloads, chat, and FAQ.
Drag blocks above or below the order summary based on priority. Mobile users see top-of-page blocks first, so put your most important block there.
Step 5: Preview, test, and save
Click Save, then test the live page exactly as a customer would:
- Go to Orders in admin
- Open any recent order
- Click More actions > View order status page
That's the real customer view, not a mock preview. Test on a phone too: the link arrives by email or SMS, so many customers open it on a phone.
Better still: place a real test order and fulfil it with a test tracking number. That's the only way to confirm the tracking widget, the notification email, and your blocks all work together end to end.
What to Add: The Order Status Page Stack
A list of 15 things to add is bad advice. The customer arrived with a single question: where is my order? Answer that first, then earn the second ask.
Tier 1: Trust and clarity (every store)
- Real-time tracking widget with carrier data, so customers stop emailing support
- Estimated delivery date to set expectations up front
- Customer support link — one button to your help center or chat
- Clear "what happens next" text under the order summary
- Self-serve returns — already native, just switch it on. Every return handled here is a support ticket you never receive.
- Translated content if you sell internationally. Set translations at the checkout level so they carry through to this page.
Tier 2: Engagement (100+ orders/month)
- Account creation prompt for guest checkouts (this also solves the 3-week access expiry)
- Loyalty program signup or points balance
- Social share buttons — works especially well for gifts
- One-question survey after delivery. Shopify's own survey tutorial builds two: "How did you hear about us?" for the thank you page and "how are you enjoying your purchase?" for the order status page. Keep the attribution question on the thank you page and ask the satisfaction one here.
- Product reviews from other buyers of what they just ordered — reassurance during the anxious waiting window, and it warms up your own review request later
- Delivery instructions field so customers can add "leave with neighbour" without emailing you
Tier 3: Revenue (any store ready to grow AOV)
- Product recommendation block based on what they actually bought
- Discount code for their next order, with an expiry
- Refer-a-friend block with a two-sided reward
- Bundle or "complete the set" suggestions
What not to add
- A long stack of blocks — on a phone, each one pushes the tracking status further down
- Multiple competing CTAs — pick one primary goal per page
- Auto-opening pop-ups — they fight the page's actual job
- Live chat that auto-fires — let the customer click it
Order Status Page Monetization: What Works and What Doesn't
The order status page is a reassurance page first, but it can still earn. The rule is to match the ask to why the customer came back.
Shopify's own developer docs list what each page is meant to carry (shopify.dev, checked October 11, 2026):
- Thank you page: survey requests, social sharing, and download links for digital goods
- Order status page: product review requests when the customer revisits, upsell offers accepted through order editing, social sharing, and download links
Two things follow. An add-on offer on the order status page is a documented pattern, but it is an order edit after payment, not the one-click charge a post-purchase page makes. And the same docs say a checkout UI extension cannot change the order directly: it calls your app's backend, or you use a post-purchase extension, so ask an app how it adds the item before you rely on it.
- Works: a reorder or "buy again" prompt for consumables, a refer-a-friend block, a loyalty points balance, a next-order discount code with an expiry, and "complete the set" recommendations based on what they bought. These are light asks that sit below the tracking block.
- Doesn't: a hard-sell product pop-up above the tracking status. The customer came to find their parcel; an offer in the way reads as noise.
Where the one-time revenue asks go instead:
- One-click offers that add an item to the order just paid for live on the post-purchase page, which appears after payment and before the thank you page. Shopify skips it for wallet, installment, gift card and other non-card payments, and only one app can run it. Full comparison: Shopify post-purchase page vs thank you page.
- Fallback offers for the orders the post-purchase page skips go on the thank you page, as an app block. Setup steps are in how to add a Shopify thank you page upsell, and the apps are compared in the best Shopify thank you page apps.
Five rules that make post-checkout offers convert
- Show one product, not five. Choice paralysis kills post-purchase offers faster than anything else.
- Match the offer to what they bought. A grinder for a coffee machine buyer beats a generic "you might also like."
- Use a real discount. A token 5% rarely moves anyone; state the saving in currency.
- Know which page you're on. Only the post-purchase page adds to the paid order in one click; on the thank you and order status pages, accepting means a new checkout or an order edit, so keep the copy honest about that.
- Give an obvious "No thanks." Trapping customers costs you more in repeat purchase than the upsell earns.
Adding offer blocks with Oxify
Disclosure: Oxify is our app. Oxify Cart Drawer & Upsells lists "Post purchase & thank you page upsell" on its App Store listing alongside the cart drawer, and adds an offer block to the thank you and order status pages from the checkout and accounts editor, so the cart, post-purchase and post-checkout offers run on one set of product rules.
- Trigger control: show offers to everyone, or filter by what's in the order
- Manual or automatic product selection: hand-pick high-margin offers or let the app choose from order contents
- Built for Shopify badge, 4.9★ from 40 reviews (checked October 11, 2026)
- From $9.99/month with a 14-day free trial, priced by order volume
Build the offer in the app, then add the block from the Apps sidebar in the editor on the page you want. See the thank you page upsell feature and the post-purchase upsell feature.
Which Apps Do What: The Order Status Page App Landscape
"Which app should I use?" is really four different questions, and merchants waste money by installing the wrong category. Almost nobody needs all four. Here's how the ecosystem actually splits.
| What you want | Category | Apps in this space |
|---|---|---|
| Grow AOV after checkout | Upsell & post-purchase | Oxify Cart Drawer & Upsells (our app), AfterSell, ReConvert/Upsell.com, Zipify OCU, Kaching Post Purchase Upsell |
| Branded tracking at your own URL, multi-carrier | Order tracking | AfterShip, Parcel Panel (listed as CWILL Order Tracking), Track123, TrackingMore, Rush, Tracktor, Hulk Order Tracking |
| Learn why customers bought | Post-purchase surveys | Grapevine, Zigpoll, Fairing |
| Show social proof after purchase | Reviews | Loox, Judge.me, Okendo |
| Custom internal order stages | Custom order status | StatusPro, W3 Custom Order Status |
What the upsell listings say about these pages (checked October 11, 2026)
Because the order status page is separate from the thank you page, we read each upsell app's live App Store listing on October 11, 2026 and recorded its rating, its entry price and which page it names in its listing text.
| Tool | Rating (reviews) | Entry price on the listing | Names the order status page? |
|---|---|---|---|
| Oxify Cart Drawer & Upsells (our app) | 4.9 (40) | $9.99/month at 0-100 orders; 14-day free trial | No: lists "post purchase & thank you page upsell" |
| ReConvert post purchase upsell (Upsell.com) | 4.8 (3,108) | Free up to 50 orders or $50 upsell revenue; $9.99/month for 51-100 orders | No: lists "thank you page upsell" |
| One Click Upsell - Zipify OCU | 4.6 (569) | $9.95/month while upsell revenue is up to $200 a month | No: lists thank you page offers and one-click post purchase |
| Kaching Post Purchase Upsell | 5.0 (385) | $4.99/month at 99 orders a month | No: lists thank you page upsell and one-click checkout upsells |
| Shopify Checkout Blocks (content blocks, not upsells) | 4.1 (220) | Free | Yes: "thank you and order status pages" |
The tiers are metered differently (orders for Oxify and Kaching, orders or upsell revenue for ReConvert, upsell revenue for Zipify), so compare at your own volume. Listing text is not proof either way: Oxify's own thank you page upsell feature page describes an order status block even though its App Store listing says "thank you page upsell". The reliable test is the one from Step 4: install the app, open the editor, switch the page selector to Order status and see whether its block appears in the Apps list. If it doesn't, ask the developer before you pay.
On October 11, 2026 the AfterSell listing showed "not currently available"; check the listing before installing.
How to choose without overbuying
Ship domestically with one or two carriers? You probably don't need a tracking app at all. Shopify's native carrier integration already shows live status on the order status page. A dedicated tracking app earns its keep when you ship internationally, juggle many carriers, or need tracking notifications Shopify doesn't send natively.
Want more revenue per order? That's an upsell app, and it belongs primarily on the thank you page, not the order status page. This is the category with the clearest, fastest payback, because it adds revenue instead of redistributing it.
Not sure why people buy from you? A one-question survey app is the cheapest attribution data in ecommerce, and post-purchase is the one moment customers will actually answer.
Already run a reviews or loyalty app? Check what it can place on this page before buying anything new. Shopify's docs list product reviews as an order status page example.
The trap to avoid: stacking a tracking app, an upsell app, a review app, and a survey app onto one page. You get four blocks fighting for attention, a slower page, and four subscriptions. Pick the one that matches your actual bottleneck — support tickets or AOV — and add a second only once the first is earning.
Where Oxify fits
To be straight about it: Oxify is an upsell app, not a tracking app. If your problem is "customers can't find their package," a tracking app solves that better and we'd tell you so.
Oxify Cart Drawer & Upsells (our app) fits when your problem is average order value and you want the cart drawer (free gifts, progress bar, BOGO, volume discounts), product page, post-purchase and thank you page offers under one subscription and one set of product rules; its listing names all of these. It isn't unique in that: the ReConvert and Zipify OCU listings in the table above also name several placements. Choose on the cart experience, the price at your own order volume and how each app's block behaves in the editor.
The practical case for consolidating is upkeep: a cart drawer app plus a separate thank you page app means two subscriptions and two sets of product rules to keep in sync.
Who should avoid it: stores that only need order tracking, and stores that only want a free or very cheap post-purchase offer at low volume. The Oxify listing has no free plan, while on October 11, 2026 Kaching Post Purchase Upsell listed a $4.99/month entry tier and ReConvert a free tier up to 50 orders.
Customization Options by Shopify Plan
Buried in every other guide, but it decides what you can actually build:
| Feature | Basic, Grow, Advanced | Plus |
|---|---|---|
| Brand colors and fonts | ✅ | ✅ |
| App blocks on Thank you page | ✅ | ✅ |
| App blocks on Order status page | ✅ | ✅ |
| Content blocks via Shopify's free Checkout Blocks app | ✅ | ✅ |
| App blocks on the Checkout itself | ❌ | ✅ |
| Custom UI extensions | Limited | Full |
| Checkout Branding API | ❌ | ✅ |
Stores on Shopify Plus can add UI extensions to Checkout, Thank you, and Order status. Stores on Basic, Grow, and Advanced can add them to Thank you and Order status only.
Translation: you do not need Shopify Plus to customize the order status page or the thank you page. You only need Plus to customize the checkout flow itself. Anyone telling you otherwise is working from pre-2025 information.
If a guide tells you something is Plus-only, check its date against Shopify's help center.
Troubleshooting: Order Status Page Not Working
The four issues that generate the most support tickets, and what actually causes them.
"Order not found" when the customer opens the link
Almost always the access window. The customer is either past 3 weeks in their original browser, past 2 weeks in a different one, or opening it on a device that isn't the one they bought on (clicked the email on their phone after ordering on desktop). Fix: have them verify with order number plus the email or phone used at checkout, or log into their account. Encouraging account creation on the thank you page prevents this permanently.
The tracking link is missing from your emails
Your notification template was customized at some point, which stops Shopify auto-inserting the link. Add {{ order_status_url }} back into the template manually, or revert the template to default and redo your branding. Check the order confirmation, shipping confirmation, and shipping update templates — it's usually all three.
No tracking updates showing
Two causes. Either no tracking number was attached to the fulfillment (the page can only show what it's given), or you're shipping with a carrier Shopify doesn't natively support, in which case you get an outbound tracking link instead of live status. Adding the carrier name alongside the tracking number when you fulfil improves the match rate. If the order was fulfilled with no tracking number at all, the status stays On its way until you mark it delivered.
Your old customizations vanished
You were auto-upgraded at the August 26, 2026 deadline (or when you paused the store). Script-based customizations were removed, not migrated, so there is nothing to restore: rebuild with blocks and custom pixels, and check your ad platform conversion reporting immediately, because that usually broke at the same time and it's the expensive part.
Common Mistakes That Tank Your Order Status Page
- Cluttering the page with widgets. Each extra block pushes the tracking status further down a phone screen.
- Never testing on mobile. The link arrives by email or SMS, so many customers open it on a phone.
- Upsells without a real discount. A token 5% "offer" rarely moves anyone.
- Generic recommendations. "Bestsellers" sells far less than relevant complements.
- Ignoring the repeat traffic. Customers return to this page several times per order. Those are free impressions you already paid to earn.
- Putting the revenue block on the wrong page. One-click upsells belong on the post-purchase page and fallback offers on the thank you page. The order status page is for reassurance first, then lighter asks.
- Stacking four apps on one page. A tracking app, an upsell app, a review app, and a survey app means four blocks competing, a slower page, and four subscriptions. Start with one.
- Buying a tracking app you don't need. If you ship domestically with supported carriers, Shopify already does this for free.
- Assuming the auto-upgrade went fine. It removed scripts silently; if you never re-checked your pixels after August 26, 2026, you may have a reporting gap you haven't noticed.
Pre-Launch Checklist
- [ ] Branding matches your storefront (logo, colors, font)
- [ ] Page selector was set to Order status, not Checkout or Thank you
- [ ] Real-time tracking widget added and tested against a real fulfilled order
- [ ] Customer support link visible above the fold
- [ ] At least one engagement or revenue block on the order status page
- [ ] Post-purchase page has an app selected, and the thank you page has a fallback offer for wallet and PayPal orders
- [ ]
{{ order_status_url }}present in all three notification templates - [ ] Mobile view tested on both Android and iPhone
- [ ] All installed apps are checkout-extensibility compatible
- [ ] Legacy pixels rebuilt as Custom Pixels under Settings > Customer events
- [ ] Conversion tracking verified firing on a real test order after upgrading
Frequently Asked Questions
Can I customize the Shopify order status page without coding?
Is the order status page the same as the thank you page?
Do I need Shopify Plus to customize the order status page?
What is the Shopify order status page URL, and can I change it?
yourstore.com/orders/{order_token}, sometimes with an /authenticate?key=... parameter. Find it via Orders > open the order > More actions > View order status page. You can't rename the /orders/ path or the token in admin, theme code or an app; a branded tracking URL needs a third-party tracking app that hosts its own separate page.How long can customers access their order status page without logging in?
Why is the order status link missing from my emails?
{{ order_status_url }} back into it under Settings > Notifications. Check the order confirmation, shipping confirmation, and shipping update templates.When was the Shopify checkout extensibility deadline, and can I undo the upgrade?
What is the best app for the Shopify order status page?
Do I need an order tracking app if I'm on Shopify?
How do I reduce "where is my order" support tickets?
{{ order_status_url }} in all three notification templates, attach a tracking number and carrier to every fulfillment (without one, the status stays On its way until you mark the order delivered), show an estimated delivery date, and turn on self-serve returns in customer accounts. Add a visible support link, then measure by tagging WISMO tickets for a week before and after.Should I put upsells on the order status page or the thank you page?
Can I add custom code to the Shopify order status page?
Bottom Line
The Shopify order status page is easy to leave at Shopify's default. Every paying customer can reach it, customers can revisit it throughout the delivery window, and it is the page they open when they want to know where their order is.
Fix it in one afternoon, in this order:
- Check the upgrade: every store is on the new pages since August 26, 2026, so confirm your pixels fire and your blocks render on a real test order
- Deflect — brand the page, show live tracking and an estimated delivery date, turn on self-serve returns, add a support link. This kills tickets you're already paying for.
- Monetize — run one-click offers on the post-purchase page, a fallback offer on the thank you page, and keep the order status page to lighter asks like referrals, reorders or a next-order code
- Test with a real fulfilled order, on mobile, then ship it
Do them in that order. A customer who can't find their tracking number will never accept your upsell.
For step 3, you can use Oxify Cart Drawer & Upsells (our app). It covers post-purchase, thank you page and order status page offers plus the cart drawer and product page offers that feed into the same order, so you're not paying two apps to do one job. Built for Shopify, 4.9★ from 40 reviews, from $9.99/month with a 14-day free trial (checked October 11, 2026).
An afternoon of setup, then check the numbers monthly: WISMO tickets per 100 orders, and accepted offers per 100 orders.